Cross Stitch Academy
Learn Cross Stitch In 5 Minutes
Counted cross stitch is easy to learn! Print out this graph and instructions and share it with others. You can also download the instructions in PDF format (270K). You will need Adobe Acrobat to view and print. The .pdf format page prints on a single sheet of paper and is great for classes! Feel free to make copies.
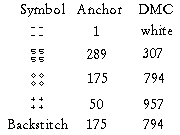
Counted cross stitch transfers a design from a printed graph onto evenweave fabric. The stitcher uses embroidery floss to place X's on the fabric corresponding to symbols on the chart. Each symbol on the chart represents one X on the fabric. The different styles of symbols on the chart represent different colors of floss.Cross stitch is easy to learn and requires only a few supplies.
GRAPH. This is the pattern or design you chose to stitch. There are thousands to choose from.
EVENWEAVE FABRIC. The fabric for cross stitch is woven in an even manner so that you know exactly where to place your needle. To keep the fabric from raveling either sew the edges on a sewing machine or use Fray Stop to prevent fraying.
NEEDLE. A tapestry needle is used, usually a size 24 or 26 (size 26 is smaller than size 24). This type of needle has a blunt point and a large eye. Use a size 24 for stitching on 14 count fabric; use a size 26 for fabric with a stitch count greater than 14.
FLOSS. Embroidery floss is a cotton thread used for stitching. Floss has 6 strands, but usually you will use only 2 strands at a time for stitching and 1 strand for backstitching. On Hardanger fabric (22 count) you usually will use only 1 strand; on 11 count Aida use 3 strands to stitch and 2 to backstitch. Most books and graphs suggest either DMC or Anchor brands.
EMBROIDERY HOOP. A plastic embroidery hoop is helpful to hold the fabric while you stitch. Remove the fabric from the hoop when you are not stitching to keep from getting 'hoop marks.'
SCISSORS. You can start out with any pair of scissors, but pretty soon you will want to get a nice pair of small embroidery scissors. Get a good quality pair with sharp points. A good pair of scissors makes stitching a lot more fun.
CHOOSING YOUR FABRIC
There are dozens of fabrics to choose from. They will all work, so you just have to decide on what you like. White or ivory Aida 14 is the most common and 14 count is an easy fabric to start on. The number of stitches per inch will determine the finished size of the design. A design that is 28 stitches wide stitched on Aida 14 (14 stitches per inch fabric) will be 2" wide. The same design will be 2 1/2" wide on Aida 11, and 1 1/4" stitched on hardanger (22 stitches per inch). Thankfully, most designs show design sizes for different counts of fabrics. Be sure to allow extra fabric for finishing (at least 4" extra on length and width).
TO BEGIN
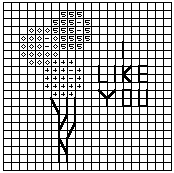
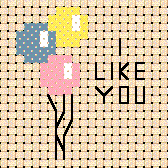
Find the center of the graph. For most patterns this is shown with arrows or a bold line. Next, find the center of your fabric. An easy way to do this is to fold the fabric in half vertically and "pinch" with your finger to make a small crease. Open the fabric, fold in half horizontally and make another "pinch". Open the fabric up. The two creases will mark the center of the fabric. Most stitchers like to start stitching close to the center of the design. For the "I Like You" graph, start with the pink balloon.
Knots on the back will show through, so do not use any knots to start or end. To begin stitching, bring the threaded needle up from the back of the fabric leaving about a 1" tail of thread behind the fabric. Stitch the next 5 or 6 stitches over the tail. Clip off extra thread. To end off, weave your needle back through the last 5 or 6 stitches and clip the thread short so as not to leave a loose tail.
STITCHING
There are two methods. The first method is to work a row of half stitches (////), then work back (\\\\) to complete the X's. Use this method for most stitching. The second method is to complete each X as you go. Use this method for vertical rows of stitches.
It is important that all the X's are crossed in the same direction. That is, the top thread of the X should always slant in the same direction (either \ or /). It does not matter which way they slant, but if they are mixed the finished piece will look uneven.
Relax as you stitch. Your stitches should lay flat on your fabric and not distort the holes or the fabric.
BACKSTITCHING
Backstitching is a running stitch (not an X) used to outline an area or to form lettering. In the graph, the words "I Like You" and the strings on the balloons are done in backstitch. Normally you use one less strand of floss for backstitching than you use for cross stitching.
CARRING YOUR THREAD
Sometimes a color will have only a few stitches and then "jump" to another area. Most of the time you should end off and start again, other times you can carry the thread along the back. Just jumping from area to area is easier than starting and stopping, but sometimes the thread will show through. This can be a problem if you jump a dark thread over an unstitched area of light fabric. In general, you can carry the thread to another area if the jump is short, the floss color is light, and you are jumping over a previously stitched area. In the "I Like You" graph, the white highlights on the three balloons can be done by starting at the top balloon, jumping to the middle balloon, and then jumping to the bottom balloon.
FINISHING
When your stitching is complete, wash in cool water using a mild liquid detergent. Rinse well. Do not wring, but roll in a clean towel to absorb most of the water. While still damp, place face down on a terry towel. Place another cloth on top of the needlework and press lightly with a warm iron. Let dry. Then frame or finish as desired. The "I Like You" design will fit nicely in a flat round, scalloped, or octagonal glass paperweight.
Source: Yarn Tree website.


